Clear as Mud: 5 Common Methods for Contaminated Soil Testing
You can often tell how land has been used decades after based on the composition of its soil. Depending on what the land needs to be used for, the absence of nutrients and biodiversity, or the presence of toxic contaminants, can all affect its value and viability.
There are several common methods for contaminated soil testing, and some are more effective and efficient than others. Read on to learn about them.
What is Contaminated Soil Testing?
Contaminated soil testing checks soil for the presence of toxic materials, such as:
- Chemicals
- Waste
- Metals (especially arsenic, mercury and lead)
- Pesticides
- Asbestos
For land to be viable for certain industries, especially agriculture, it needs to be tested. Likewise, for land to be developed into residential areas, the soil needs to be safe for human habitation.
Why is Accurate Contaminated Soil Testing Important?
Contaminants in soil can harm people in a lot of different ways. It can be absorbed into crops and eaten, and it can be absorbed through our own skin or inhaled. It’s also possible for contaminated soil to leach into the water supply.
Asbestos soil contamination in particular is a serious threat, as asbestos can lead to terminal illnesses.
This high risk to human health means the testing of soil is highly regulated. To develop land without the risk of lawsuits, it’s essential that you have a testing method that is fast and accurate.
The 5 Most Common Methods for Contaminated Soil Testing
The below methods are the most common contaminated soil testing methods, but some are more effective than others.
1. Gas Chromatography (GC)
The gas chromatography method takes a sample, in this case a small portion of soil, and is put into a gas chromatograph. This device then heats the sample to make it volatile. This heat converts the sample to gas, which passes through an analytical column.
At the end of the column is a detector, which analyses the gas. Different components of the sample will produce different gases, which are recorded by an acquisition software, and will create a chromatogram, which shows a breakdown of the components of the sample.
The problem with GC is that it is a physical testing method, which comes with several limitations. First, it destroys the sample in the process, which means two samples need to be taken, one for your GC test, and another for lab confirmation.
The gas chromatography is also prone to malfunctions, gas leaks and incorrect assembly. If this occurs, not only does it potentially skew results, but it also costs time and requires another sample to restart the process. Overall, even when GC works correctly, it takes a long time compared to other technologies in this list.
2. Laser-Induced Fluorescence (LIF)
The laser-induced fluorescence method takes a sample and excites it with a laser. The molecules of the sample become so hot that they become electronically excited. As they return to their ground state, their fluorescence and the resulting spectrum is captured by a photodetector.
LIF can also be used to detect vibration wavelengths in liquid samples. In these cases it’s the vibrations that are measured.
Laser-induced spectroscopy is a popular method, but it does have a serious drawback. It’s predominantly designed to identify hydrocarbons, which makes it an excellent testing method for gas, petroleum and oil contamination. The problem is, organic and certain heavy metal substances can also fluoresce and affect the readings.
3. Infrared Spectroscopy (IRS)
The infrared spectroscopy method uses infrared radiation to test the composition of a sample. By exposing a sample to infrared radiation, the time it takes for the radiation to be absorbed can be measured. Because the sample will be made of various components, the absorption rates will differ on a molecular level. These differences can then be mapped spectroscopically.
IRS generates very accurate results, because it can test very narrow wavelengths. The problem is, to achieve this, the sample needs to be prepared into very thin layers to facilitate attenuated total reflection (ATR). This can be very time consuming.
4. Near Infrared Spectroscopy (NIR)
The near infrared spectroscopy method works very similarly to IRS. It also uses radiation absorption times to create a spectroscopic outline of the different components in a sample. Where it differs is the kind of radiation it uses. As its name suggests, it uses near infrared, rather than fully infrared radiation. This allows it to detect a broader electro-magnetic range.
Unlike IRS, NIR doesn’t require complex sample preparation because it has the capacity to detect more broadly. This means it is a great tool for testing a wider range of samples, and for testing them quickly.
The only problem is that to allow the broader range, there is a necessary tradeoff in detection limits. This means it’s ideal for giving an overview of the presence of possible soil contamination, but you would be better off using IRS for a comprehensive breakdown of a particular sample.
Combined, IRS and NIR can offer a robust contaminated soil testing solution.
5. X-Ray Fluorescence (XRF)
The X-Ray fluorescence method irradiates a sample with X-Ray radiation. Afterwards, as the sample stabilises, electrons emit fluorescent X-Rays of their own. Different elements have different energy release peaks, which act like fingerprints, allowing them to be recorded on a spectrograph.
While the methods may sound similar, the main difference between XRF, and IRS and NIR, is that XRF analyses at an atomic, rather than molecular level. This means it combines the accuracy of IRS with the broad spectrum of NIR.
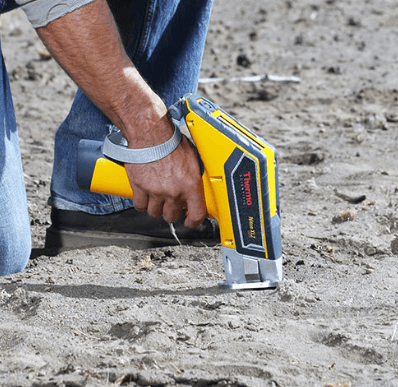
It also obtains near-instantaneous results, which makes it the ideal technology for working in the field with portable devices. Additionally, it can detect all 26 elements of EPA Method 6200, making it one of the most sought after contaminated soil testing methods in the industry.
The Niton XL2 and XL2+ Analysers

Thermo Fisher’s Niton XL2 and XL2+ Analysers are the best tools for contaminated soil testing on the market.
The XL2 is calibrated to detect 30 elements from sulphur to uranium, while the XL2+ can detect from magnesium to uranium. Along with testing for trace metals, they can also identify geochemical traces.
Their easy point-and-shoot functions and real-time results help minimise how long you or your team need to spend on potentially contaminated surfaces, and it also means testing is much quicker.
Rather than waiting for costly lab analysis turnaround times, you can reliably screen a site before starting work. Then, once lab confirmation arrives, you can start without costly interruptions.
To purchase your own Niton XL2 or XL2+ Analyser, get in touch with us today.
